First batch
I began making my first batch of mead after picking up a wine kit, and I was quite excited to get started. Perhaps I was a little too excited because after making a stop at the grocery store on the way back, I grabbed insufficient honey for the first batch.
The kit I purchased came with a 5 gallon (i.e. ~23 L) glass carboy, and according to The Joy of Mead I needed about 12 lbs (i.e. ~6 kg) of honey to make 5 gallon of mead. However, in my excitement I didn’t read that this will make a dry mead. If I wanted to make a mead with any residual sweetness, I would need at least another 1 kg of honey.
In any event I went ahead with making my first batch of mead, following the instructional videos from The Joy of Mead
The recipe I used was quite simple:
- 4 gallon of spring water
- 6 kg of honey
- 2 tsp yeast nutrient
- Lavlin EC-1118 yeast
The first three ingredients are combined in a large food grade pail, sanitized carefully (using a chlorine-based sanitizer). The yeast was re-hydrated using about 50 mL - 100 mL of water heated to 40 - 45 C (the yeast package will indicate the ideal temperature), and after waiting 15 minutes add the re-hydrated yeast to the honey-water mixture (a.k.a. must). Then you stir the mixture vigorously for 5 minutes to aerate it, then close the pail and insert an airlock in the hole in the pail lid. In a few hours the airlock will start to bubble (as the CO2 escapes), but if nothing happens after 24 hours then you may need to add more yeast nutrient or another package of yeast. Place the pail in a cool and dark spot for about 4 weeks, or when the airlock only bubbles about twice a minute.
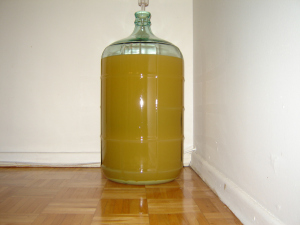
At this point I transferred the mead from the pail to a sanitized glass carboy, this was accomplished using a food grade plastic tubing that came with the wine kit. This is what my first batch of mead looked like after a month:
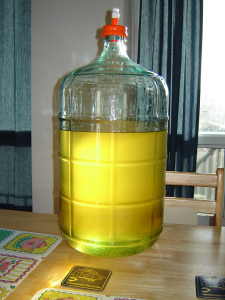
After two weeks, some of the yeast and particulate matter that was in suspension in the liquid, settled to bottom. I was instructed to transfer the mead to a clean container at least two or three times over the course of three months, and after that time had elapsed this was my final product:
You lose a little of the mead every time you transfer it to a clean container, since you usually want to leave behind all the gunk that has settled to the bottom. Also, to increase the clarity of the mead, I used a clay substance called bentonite which grabs some of the smaller particles in suspension and drags them down to the bottom. This isn’t necessary, unless you don’t mind consuming cloudy mead and/or seeing sediment at the bottle of the wine bottle. Though you should transfer your mead off that bentonite sediment, which you should do after about a week. A note if you are going to use bentonite: make sure that when you add it to do so at the beginning of a transfer, and after most of the particulate matter has settled to the bottom (so after the first or second transfer). I say this since you have to stir in the bentonite thoroughly, so it makes no sense to do that when there is a large amount of sediment already at the bottom of your vessel. I speak as someone who was somewhat impatient, and had to use the bentonite a second time and transfer several more times as a result.
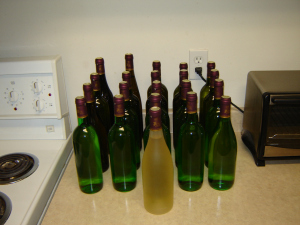
After wrangling with the bentonite, I manged to bottle and cork my first batch of mead. To make it look more professional, I added plastic shrink-wrapped caps on the top of the bottles:
So the big question, how does it taste? Well, let us just say that the aroma of this mead is reminiscent of turpentine, and the flavour evokes images of rocket fuel. I did not measure the alcohol content of this first batch, but by its ability to degrease engine parts, I would hazard a guess that it is between 15% - 18% ABV. Since I didn’t add anything else to this recipe, the mead is also very neutral. In latter batches I exploit this feature.